


INTRODUCTION
What are your opinions about the Python Programming Language? If you are given this floor of analysis, your answer could be a lot of things or just a few things. Python is a high-level, general-purpose programming language with easy-to-read syntax similar to English that operates on an interpreter system, which means that the code can be executed immediately after it is compiled. Also, it uses notable indentation and its development model prioritizes understandability, which supports one of its philosophies:
Simple is better than complex
Although Python is most commonly used in Machine Learning, data analysis, database management, and deep learning (image processing, text recognition, and natural language processing), it can also be employed in web scraping, automation, robotization, mobile app development, and simple web applications. One of the python Web Framework is known as Flask
In this article, I'll walk you through everything you need to know about Flask and we will build a simple web app together after which you will code your own web application from scratch and follow few steps to deploy your simple web app to Heroku, a free web hosting service. This article is intended for beginners with no prior knowledge of flask, so feel free to code along as you read, and if you encounter any bugs or challenges, don't hesitate to leave a comment or send an email.
To successfully follow and complete this tutorial (article), You must:
Have Python 3.7, Anaconda, and an editor (Pycharm, Vs Code, or Sublime Text) installed on your local computer. You can use any of the three editors, though I will be using Sublime Text 3 to execute codes in this tutorial.
Have prior knowledge of basic HTML, CSS, and maybe JavaScript.
Have a virtual environment, Flask, and its' dependencies installed on your local computer/laptop
You can check out this article to learn how you can install your virtual environment. Once you are done installing your virtual environment, you can install Flask and a few packages you will be needing in this article by running the following on your command prompt.
pip install flask

pip install flask_sqlalchelmy

pip install request
Congratulations! You successfully completed your installations and now, let's proceed to the next stage of this tutorial (article).
WHAT ARE WEB APPLICATIONS
Web applications also referred to as web apps are software applications that run in an internet browser and perform a variety of tasks, unlike other applications that are installed directly and natively on the device's operating system. Web apps typically have a short development cycle and can be created by a small squad that uses templates rather than traditional software developer kits although most web apps can be developed from scratch using HTML, CSS, Flask, JavaScript, etc.
Although websites and web apps offer both textual and visual information that can be displayed and read, there is one significant distinction between the two is:
A website is a group of globally accessible, interlinked web pages which have a single domain name. A web application is a software or program which is accessible using any web browser.
UNDERSTANDING FLASK AND HEROKU
FLASK
Unlike the Django framework, Flask is a micro easy-to-learn web application framework written in Python. It is called "micro" because it is not self-contained! It uses HTML to generate the structure of web pages, CSS to style the structure as well as make it look beautiful, JavaScript to interact with various elements on the page, and Python to interact with the web server, and also the backend. As you can see, Python is only a minor fraction of Flask. Although Flask does not have many web application tools and larger Flask applications can be hard to understand, its' flexibility simplifies the creation of web apps. It is also known as the WSGI framework, which stands for Web Server Gateway Interface. This means Flask's functionality is dependent on the WSGI external library and the Jinja2 template engines.
HEROKU
Heroku is an elegant, flexible, and user-friendly platform that offers developers the simplest path to getting their App deployed and also to supply chain. In a nutshell:
Heroku is a cloud platform as a service (PaaS) that lets companies build, deliver, monitor, and scale app-we're the fastest way to go from idea to URL, bypassing all those infrastructure headaches.
In this article, you will be redirected to a page where you will learn how you can publish your simple web app to the internet using Heroku which is also a free server. You can learn more about Heroku here.
FLASK WEB APP FOLDER STRUCTURE
A proper flask application folder adheres to a standard structure in order for the app to function. Make sure you understand this concept; otherwise, you may encounter a 505 web page error.
Application Folder or Directory: This is also known as the root folder or directory, and it will house all of the other folders and files we will create for developing this web app. The first step in setting up your folder architecture is to create your root or application folder and name it sayWelcome. This root folder will contain additional 2 folders which are the static folder and templates folder
- Static Folder: The static directory or folder contains assets that will be used by the templates i.e. CSS files, JavaScript files, and images. We will only use one asset file called main.css in this simple web app. What comes next? Open the newly created root folder and create a new directory or folder. This new folder should be called Static. Once you have your static folder, proceed to creating a new folder in the static directory or folder and call it CSS. You've successfully completed the static folder task! Return to your home directory.
Templates Folder: This folder only contains templates that are simply Html documents. To create this folder, proceed to your root folder and create a new folder. Name this new folder Templates. Inside the template folder, create another file and name it index.html. The .html extension should be used to make this new file an Html document.
- .py file: This web app must include the .py file in relation to the Static and Templates folders. The .py file should be in the root directory, not inside the static or template folders. The final step is the creation of a .py file inside the "sayHello" folder. Name this .py file: app.py.
The structure of the Flask folder set up for this web app is summarized below.
                       sayHello
                         ├── static/
                         │   └── css/
                         │       └── main.css
                         ├── templates/
                         │   ├── index.html
                         ├── app.py
BUILDING OUR WEB APP
Html
Html is a markdown language that is employed when writing websites and web apps code. It is responsible for the structure of the website and web apps and consists of two major structural components: <head and <body.
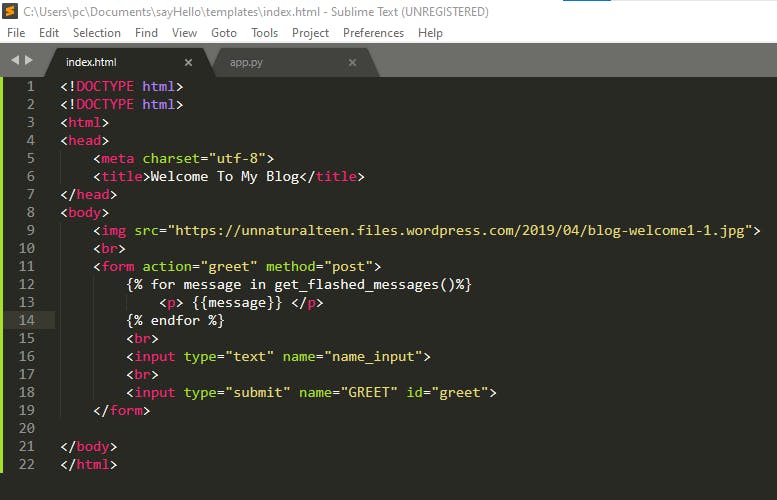
Using tags, HTML plays an important role in organizing and displaying web content. These tags serve various purposes, such as informing the browser when to display a heading, or paragraph, italicize a word, display a picture, or even initiate a new concept. Take a good look at the code below:
<!DOCTYPE html>
    <html>
      <head>
             <meta charset="UTF_8">
              <title>Welcome To My Blog</title>
         </head>
          <body>
                <img src="https://unnaturalteen.files.wordpress.com/2019/04
                 /blog-welcome1-1.jpg">
                 <br>
                  <form action="greet" method="post">
                           <p> What's your name </p>
                           <br>
                           <input type="text" name="name_input">
                           <br>
                           <input type="submit" name="GREET" id="greet">
                   </form>

             </body>
    </html>
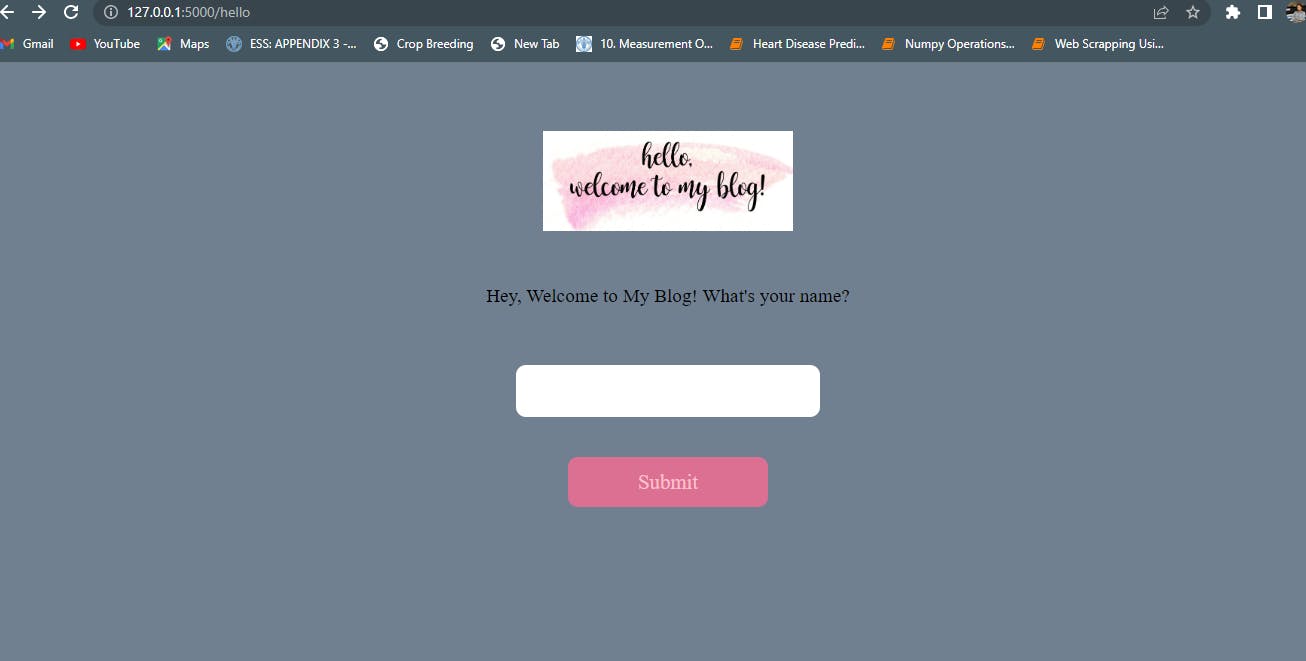
If you write this code on your editor and run it on your browser, you will get a web interface similar to the image below:
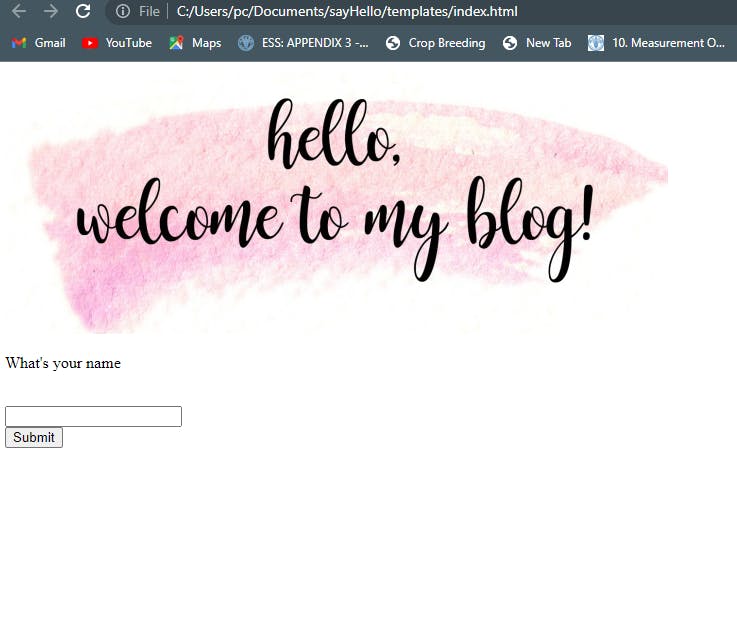 What did you notice or see? Of course, the web structure and layout! As a result, Html represents the overall skeletal structure of the web app.
On our web app interface, you can find the logo, paragraph, input, and lastly button! That's beautiful, right? Let's go ahead and make the web app more interactive.
What did you notice or see? Of course, the web structure and layout! As a result, Html represents the overall skeletal structure of the web app.
On our web app interface, you can find the logo, paragraph, input, and lastly button! That's beautiful, right? Let's go ahead and make the web app more interactive.
N.B: You use the image of your choice by simply opening the image on a new tab and copying the image link.
app.py
The app.py file, just like every other .py file is a program file or script written in Python and contains the flask framework. It can be created and edited in a text editor, but it has to be executed with a Python interpreter (if you are using VS Code or Sublime text). In this article, We will use the app.py file to make the website more interactive and responsive and execute it using an anaconda prompt i.e Python Interpreter.
To run the app.py script, make sure you have installed Flask and its dependencies as stated at the beginning of this tutorial. If you've done that, beautiful! Proceed to the code below:
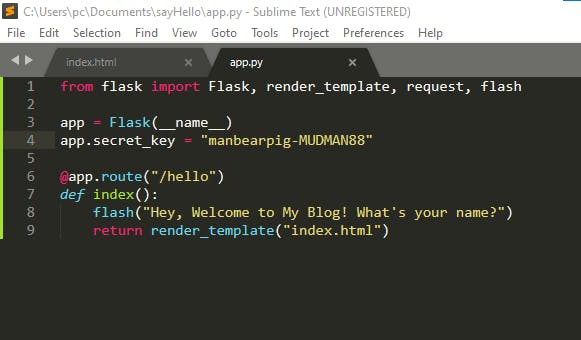
from flask import Flask, render_template, request, flash

app = Flask(__name__)

@app.route("/hello")
def index():
    return render_template("index.html")
Maybe you are not familiar with these lines of code? Here's a simple interpretation:
The app = Flask(name) initializes our flask app
The @app.route("/hello") creates a route for the website i.e the last part of our URL.
The def index() creates a function for the route in order for Flask (python) to return the Html template.
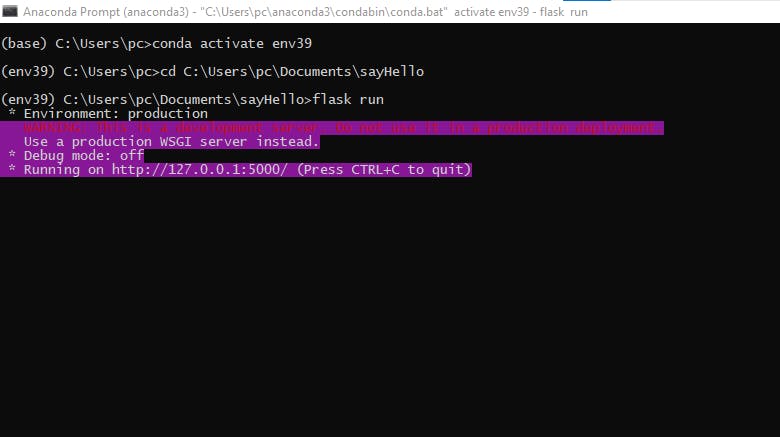
Once you are done with this code, navigate to your anaconda prompt and follow the following steps to run your python code:
Activate your virtual environment with
conda activate virtual-envIn my own case, my virtual environment is env39 but you can go ahead and replace the virtual-env with your environment name.
Input the path of your parent directory or folder.
cd C:\Users\pc\Documents\sayHello
- Run your flask app once you have your app path.
flask run
This command and outcome can be seen in the code screenshot below.
 You have successfully executed this code; now, copy the path and paste it into your browser with the "/hello" route at the end of the URL.
This is what we got! You've successfully linked your Html document to your app.py file and can now access it through flask rather than through our file system. Also, Peep the "/hello" at the end of our URL. I hope that makes you understand what @app.route does.
To make the website more interactive, we can make the paragraph text adjustable. For this, Flask provides something called flash. Flask includes the flash() method for generating relevant information. It generates a message in one view and displays it as a template view function. Thereby generating feedback in applications and user interfaces. In other words, the flask module's flash() method passes the information to the next request, which is the Html template. The code below gives an in-depth explanation of flash syntax.
Here's a little explanation to simplify the code:
Message is the information that is displayed to the users and of course needs to be extracted in the template for this purpose, the flash() method which is get_flashed_messages() is called in the Html document.
{{% %}} initiates the flash module and the end for terminates the for loop in the Html document. Once you've finished initializing the flash module in the Html document, navigate to your app.py file and set your initial messages to flash("any text of your choice").
When you run this code, your paragraph content will be displayed in your browser as Hey, Welcome to My Blog! What's your name?, but this time around being accessed with a flash module and can't be found anywhere in our Html document. Magical? Flash does the magic.
If you previously encountered an error telling you to set a secret key, that bug has been resolved in the code above using app.secret_key. The secret can be set to anything which can be random numbers, an alphabet, or the two.
Now that we've completed our flash message, let's work on the text that will appear after a click event on the greet button.

in the code screenshot above, in order to get a response after we click on the greet button, we will create a new route " /greet". This time, however, because we are interacting with a server, we must also specify the methods of our interaction which are POST and GET.
GET and POST are the two most commonly used HTTP request methods. Typically GET requests are used to request webpages while POST is used to send data to the webserver such as through a webform. Tip: While they are called HTTP methods, both GET and POST are also used in HTTPS.
Afterward, we will go ahead to connect a function to this route and then use it to fetch input information from the user. So if I should enter a name, Jacia, I'll get the response below:
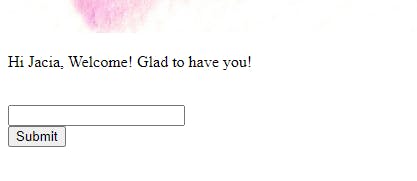
Yaaayyy! That is quite responsive but not impressive. If you are a smart learner, you will definitely have lots of questions by now. Your possible questions may be:
What's the deal with the disorganized web app page?
Why are the page's contents in the corner?
How do I add some color to the app?
How do I customize this web app?
If these are your questions, they are accurate and you can do a whole lot more on this web app using CSS.
CSS File
In the introduction to this article, I stated that HTML represents the architecture or str of a web application, Python is used to interact with the frontend and backend, and CSS (Cascading Style Sheet) is used to beautify and modify the web page.
According to this source
CSS is the language for describing the presentation of Web pages, including colors, layout, and fonts. It allows one to adapt the presentation to different types of devices, such as large screens, small screens, or printers. CSS is independent of HTML and can be used with any XML-based markup language. The separation of HTML from CSS makes it easier to maintain sites, share style sheets across pages, and tailor pages to different environments. This is referred to as the separation of structure (or: content) from the presentation.
Moving on, let's use CSS to make the magic you're picturing happen on our web app. We can accomplish this with a main.css stylesheet.
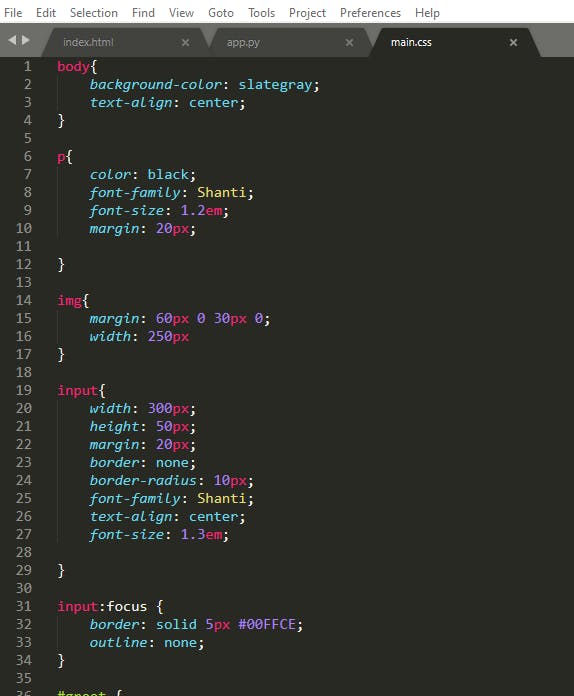

This script contains possible colors, fonts, styles, image sizes, text sizes, etc. that we may want to see on our web app. Don't forget to link this CSS stylesheet to HTML using the <link rel action just as in the code below:

Boom! This is our beautifully designed and decorated web app.
If you encountered a static environment while running this code, all you have to do is clear the cache data of your browser and refresh your browser.
At this point, you have your web app ready for deployment! But I wouldn't advise that either because I need you to code this from the scratch and enjoy the process rather than the CODE ALONG we just did.
So what's next? Go ahead and delete every single folder and file we used in this tutorial and try coding your web app from the scratch using your own syntaxes, styles, texts, colors, and ideas. That will be fun!😂😂😂
Are you curious to know how you can proceed to deploy your web app to Heroku, we are just a few steps away! Followthese procedures to deploy your first python web application.
CONCLUSION
Congratulations! You made it to the end of this tutorial and if you followed the procedure attentively, you should already have your app deployed to the web. You may encounter problems coding along, coding from scratch, or deploying your web app to Heroku but not to worry! Just take your time and be gentle with the whole process and you will sure complete this tutorial successfully.