An Introduction To Web3.py: How to build and interact with solidity smart contracts in Python


The internet (web) has undoubtedly evolved constantly over the recent years and each evolution brought agile methodologies that are relevant to the users. Let me take you down memory lane.
The web 1.0 era lasted from 1991 to 2004. In this era, the web was simply static pages that consumers (users) would load and retrieve information from with little or no interaction with the internet. There wasn't much done on the web during this time period because the internet was simply a repository of information, with all pages linked together. There was no logging in, no interaction with posts, and no ad campaigns were displayed.
From 2004 to the present, the web has been modified into an unrivaled interactive platform, web 2.0. In this era, not only were we obtaining information from the web but vice-versa. We contributed a quota because the web also started to retrieve information from us. As we proceeded to input our details into platforms like Facebook, Google searches, and online forms, the web began gathering and recording information about us to better serve us and keep us on their website for longer periods which in turn generates revenue for them. Web 2.0 has advanced the use of AI and machine learning in the world's leading corporations. ML algorithms can now be used to provide individual users with relevant news feeds and advertisements. Furthermore, the internet can easily connect our social media personalities with our real-life personalities especially when we perform searches with an unguarded IP address. Because everything revolved around the data collected, top companies sell customer data to advertisers so they can easily reach their target audience, thereby denying customers data privacy.
Web 3.0 is the new trend and the digitally synchronized era which has not arrived at its destination! It's better to call it a work in progress. The unique thing about Web 3.0 is that it makes use of blockchain technology and distributed web tools this translates into the distribution of ownership among creators and users as opposed to centralized entities.
Decentralized autonomous Organizations (DAOs) are just like other sizable corporations like Google, Facebook, etc. The only difference is that these organizations are governed by established code written by the people that started the smart contract. This makes these organizations self-sufficient and resistant to change by centralized authorities.
In this article, you will learn about web3 terminologies, web3.py, and how to build and interact with simple Ethereum solidity smart contract using web3.py. Let's dive deep into this tutorial.
Web3 Terminologies
There are web3 terminologies that every web3 enthusiast should be familiar with. I may not explain or list everything here, but I will highlight some key terminologies.
Blockchain: The term "blockchain" refers to a system of records that are closely linked, impervious to change, and encrypted using cryptography.
Smart Contract: A common term used in web3 is "smart contract." The phrase, which simply refers to digital contracts, was coined by Nick Szabo in 1997. A smart contract is a computer program that is stored inside a blockchain and is intended to run when certain requirements are satisfied.
Solidity: language for implementing smart contracts that are statically typed and executable.
Crypto: Crypto is a slang term for cryptocurrency, a type of digital money that utilizes blockchain technology.
NFTs: This is an abbreviation for non-fungible tokens. NFTs are non-interchangeable tokens that protect the genuine ownership of digital assets like music, art, etc. by establishing an ownership-defining digital signature.
Public Key: is a transaction address that is well-known throughout a network and can be unlocked with private keys.
Private Key: an exclusive address that only the user has access to
Gas: Gas is the currency i.e. payment that is sent to Ethereum node agents, also known as miners, in return for the implementation of a smart contract.
Miners: These people are responsible for processing transactions and creating blocks.
Node: Blockchain nodes are network participants authorized to verify the legitimacy of each subsequent block—or group of network transactions—of transactions.
Wallet: This is a container where digital assets are kept.
Transaction: The exchange of digital assets
web3.py
Web3.0 has generated a lot of buzzes, and while the web3.js community is larger because JavaScript is the standard frontend technology, web3.py, despite being unpopular, still has a bright future in blockchain technology due to its readability and simple syntax compared to JavaScript. Web3.py is the fundamental Python library that every Python developer interested in web3.0 should be familiar with.
Web3.py is a Python library that includes additional embedded Python libraries and can be used to communicate with Ethereum. With this library, you can create Ethereum transactions, and smart contracts, access and write data from Ethereum smart contracts, and perform a variety of other tasks.
How To Build A Solidity Smart Contract With Python
This section will teach you how to create a straightforward Solidity contract (Hello World) in Python using Google Colab as your development environment. Even though we'll be utilizing Google Colab as our work environment, we'll be using Remix to code our Solidity. Remix is a Solidity IDE used for writing, compiling, and debugging Solidity code.
So, proceed to Remix and create a new file HelloWorld.sol
Once you create your file, proceed to code your solidity.
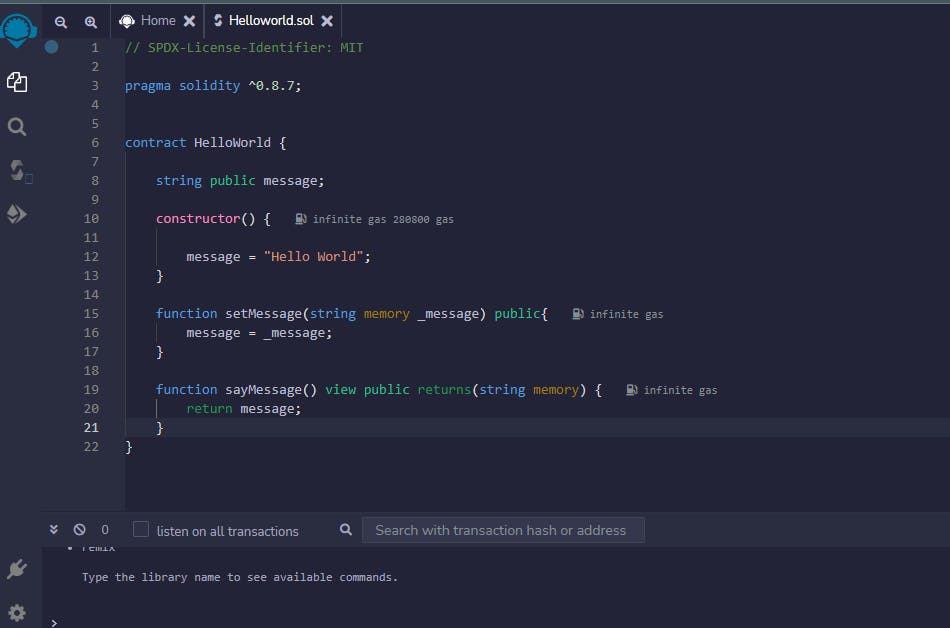
It is important you understand these few lines of code.
To begin with, you must identify the version of Solidity you are using. After you've accomplished this, create a contract called "Hello World" and it's advisable to preserve the contract's name as the file name.
Create the string variable message inside the contract.
Create a constructor to execute the contract. Set the constructor's message to "Hello World" (double quotes for strings with more than one character)
When interacting with the smart contract, the function setNewMessage will allow you to give in a new message argument, and the sayMessage is the view and public modifier that will return the message.
Actually, we can complete all of these tasks using Google Colab, but remix will nicely format our code. You can proceed and compile your solidity code on remix as soon as it is complete. Version errors may occur during the process, and the simplest method to fix them is to check out for the Solidity version you are using.
Now that the code has been properly assembled, import compile_source (used in compiling solidity) and set the compile_source to compile_sol(compiled solidity) then copy and paste this contract into Google Colab inside a multiple-line string and add the output compilation.
Once you are done with the compilation You can investigate and get more information about the contract, for instance.
The contract_id will print out the name of the contract and the contract_interface prints the abi. The abi contains information on the contract, including information about its variables, functions, inputs, and other details. Also, contract_interface can be used to get the bytecode which is converted to binary so that it can be read by the processor and can be converted to a solidity code.
When we have done this, we are ready to interact with our smart contract.
Interacting With Ethereum Smart Contracts Using Web3.py
According to this source,
A "smart contract" is simply a program that runs on the Ethereum blockchain. It's a collection of code (its functions) and data (its state) that resides at a specific address on the Ethereum blockchain. Smart contracts are a type of Ethereum account. This means they have a balance and can be the target of transactions.
The first step to starting your interaction with the Ethereum blockchain using python is to pip install and import web3 packages by running the following command on your Jupyter notebook, goggle colab, or terminal:
pip install web3
from web3 import Web3
Web3
This line of code should install the necessary packages just like the notebook below though I have this library installed already.
Our next step is to connect to the Ethereum node using the Python web3 library. A connection provider, such as the Ethereum tester provider (eth tester), the HTTPProvider, or a local provider, can be used to accomplish this. To connect to a provider of Ethereum testers in this tutorial, we will install and use an EthereumTesterProvider which is a tool for testing Ethereum-based applications.
! pip install eth_tester
from web3 import EthereumTesterProvider
EthereumTesterProvider
To check if the Ethereum node is connected, run these lines of code:
w3 = Web3(EthereumTesterProvider())

w3.isConnected()
Previously, using an Ethereum provider, we could connect to the Ethereum node. Now let's communicate with the solidity smart contract we built using the Python programming language.
The first step is to create a web3 extension using a web3 object, and after that, call EthereumTesterProvider as the node's provider. The EthereumTesterProvider is the most basic testing provider, and it provides users with test ethers.
In order to establish that this contract is a web3 contract, create a default account that uses test Ethereum because our provider has it enabled. Then, execute and print the contract using this default account, which will return information verifying this is a web3 contract. This information is displayed in the code below.
Now that we have a smart contract, we need to deploy it by submitting a formal transaction and we will assign this to a transaction hash(trx_hash). A transaction hash serves as a unique identifier for this particular transaction.
You can obtain your transaction receipt, which will include all the smart contract information, after deployment. The information includes details such as the contractAddress, cummulativeGasUsd, effectiveGasPrice, etc.
Let's finally obtain the contract using the transaction's address. A transaction address is a special identifier that acts as a digital location where digital assets are kept.
Conclusion
If it's your first time using Python to explore Web3, you should be impressed by how adaptable the language is at this stage.
Python still has a lot of potential for working with the blockchain, and I'll explain how in my next articles. Happy learning.